هذا المحتوى غير متوفر بلغتك بعد.
Custom Fields Management
Section titled “Custom Fields Management”About Custom Fields
Section titled “About Custom Fields”Custom Fields extend the standard UniCMMS data model with attributes tailored to your organization. Use them when built-in fields are not enough, such as tracking asset condition, external IDs, special approvals, or localized labels.
Custom Fields Management List
Section titled “Custom Fields Management List”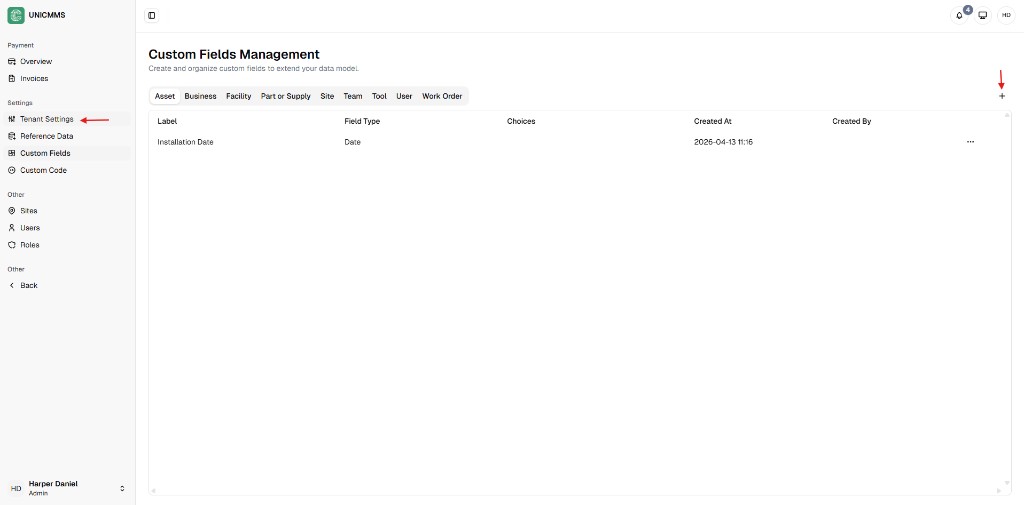
Create Custom Field Dialog
Section titled “Create Custom Field Dialog”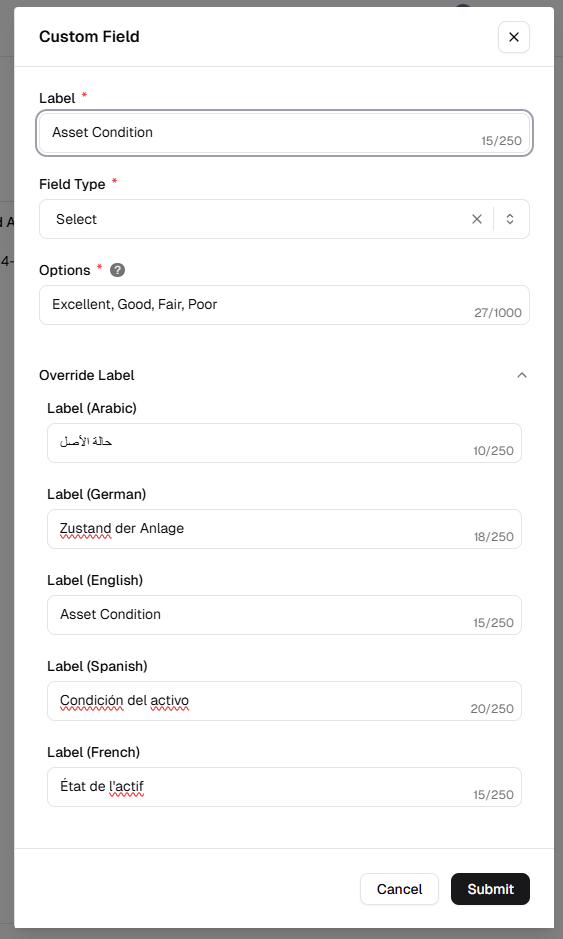
Supported modules
Section titled “Supported modules”You can define custom fields for these modules:
- Asset
- Business
- Facility
- Part or Supply
- Site
- Team
- User
- Work Order
How to create a custom field
Section titled “How to create a custom field”- Open Admin Portal from the main sidebar (Other).
- Go to Settings → Custom Fields.
- Open the module tab where the field should appear (e.g. Asset, Work Order).
- Click + to open the New Custom Field dialog.
- Complete the form:
| Field | Description |
|---|---|
| Label | Name shown to users in the interface. |
| Field Type | Data format the field accepts (see below). |
| Options | Required for Select fields. Enter choices as comma-separated values (e.g. Excellent, Good, Fair, Poor). |
| Override Label | Optional translated label for other languages. |
- Click Submit.
Label overrides (multi-language)
Section titled “Label overrides (multi-language)”Use Override Label fields to provide translated names for each enabled language. This ensures users see clear labels in their preferred UI language while keeping one shared custom field definition.
Available field types
Section titled “Available field types”Choose a type that matches how the data will be used and reported.
| Type | Use |
|---|---|
| Text | Short text (e.g. serial numbers, short notes). |
| Number | Numeric values only (e.g. capacity, dimensions). |
| Select | Dropdown: user picks one value from a predefined list. |
| Date | Calendar date only. |
| Datetime | Date and time. |
| Link | Clickable URL (e.g. manufacturer documentation). |
Verification after creation
Section titled “Verification after creation”After you submit:
- Confirm the dialog closes.
- Verify the new field appears in the selected module tab.
- Open a related record form (for that module) and confirm the field is available for data entry.
Related
Section titled “Related”- Reference Data Management — standardized lookups and classifications
- Tenant Settings — organization-wide defaults