هذا المحتوى غير متوفر بلغتك بعد.
How to Add a User
Section titled “How to Add a User”Open the Create User dialog
Section titled “Open the Create User dialog”- Open Admin Portal → Users.
- Click + Create.
The Create User modal opens. Use × in the header or Cancel at the bottom to close without saving. The form can scroll; required fields show a red asterisk next to the label.
Fill required fields (top of the form)
Section titled “Fill required fields (top of the form)”These fields appear at the top of the dialog. Text fields show a character counter (for example 0/100) and a placeholder such as Enter text here.
| Field | What it is | Notes |
|---|---|---|
| First Name * | Legal given name | Single-line text, up to 100 characters. |
| Last Name * | Legal family name | Single-line text, up to 100 characters. |
| Email * | Login ID and notification address | Single-line text, up to 100 characters; must be unique in the tenant. |
| Role * | Permission bundle | Dropdown — choose Select… then pick a role. |
| Sites * | Authorized location(s) | Dropdown — choose one or more sites as your product allows (often multi-select with tags). |
| Password * | Initial sign-in secret | Single-line field with a show/hide (eye) control. |
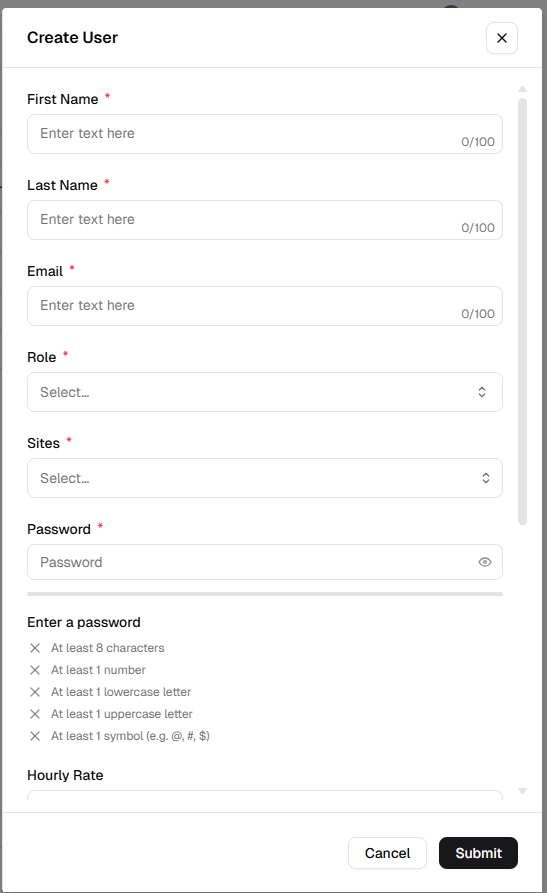
Password complexity (all must pass)
Section titled “Password complexity (all must pass)”Under Enter a password, the form lists rules and shows whether each is met. All of the following are required:
- At least 8 characters
- At least 1 number
- At least 1 lowercase letter
- At least 1 uppercase letter
- At least 1 symbol (for example @, #, $)
Until every rule is satisfied, treat the password as incomplete even if the field is not empty.
Optional fields (scroll down)
Section titled “Optional fields (scroll down)”Scroll the modal to reach labor, location, and contact fields. None of these are required to create the user.
| Field | What it is | Notes |
|---|---|---|
| Hourly Rate | Labor cost rate | Value entry; placeholder Insert a value (used for labor cost reporting). |
| Country | Region | Dropdown — Select… then choose a country. |
| Address | Street / office | Multi-line text area, up to 100 characters. |
| Job Title | Role title on record | Single-line text, up to 100 characters. |
| Phone Number | Contact / SMS where enabled | Single-line text, up to 100 characters. |
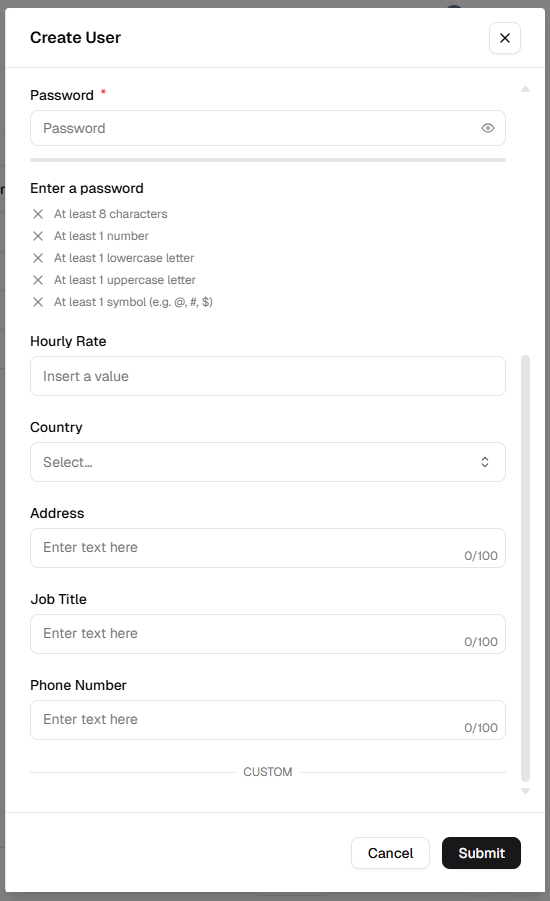
Custom fields
Section titled “Custom fields”If your organization defines user custom fields, they appear under a CUSTOM section (below the standard fields). Complete any that your process requires before submitting.
Save the user
Section titled “Save the user”- Review required fields and password rules.
- Click Submit to create the user.
- Click Cancel to discard and close the modal.
After creation, assign a license and confirm the green Licensed badge before the person can sign in—see Key operational logic.
Quick reference — all attributes
Section titled “Quick reference — all attributes”| Attribute | Description | Required? |
|---|---|---|
| First Name | Legal given name for identification. | Yes |
| Last Name | Legal family name for identification. | Yes |
| Unique login ID and destination for system alerts. | Yes | |
| Role | Permission level (RBAC). | Yes |
| Sites | Location(s) the user may access. | Yes |
| Password | Initial credentials; must satisfy all complexity checks above. | Yes |
| Hourly Rate | Cost per hour for labor reporting. | No |
| Country | Geographic region. | No |
| Address | Physical address. | No |
| Job Title | Professional designation (for example, Senior Electrician). | No |
| Phone Number | Contact for alerts and dispatch. | No |